
Node.js 백엔드 스터디(13) - NestJS로 직접 기획한 API 만들기(1) - CRU
소스 코드
[리포지 링크]
들어가기 전에
이번 장에서는 앞에서 실습했던 NesJS API 만들기를 실전에 사용해보기 위해, 예전에 실무에서 작성했던 Backedn API 요청항목 중 일부를 참고하여 직접 만들어보려고 한다.
1. Backend API 명세서 확인
Primary Key(회원 고유번호, 클래스 고유번호)를 포함한 필요한 정보는 아래와 같다.
1. 회원 고유번호*
: int
: 조회하는 용도(1).

2. 클래스 고유번호*
: string
: 조회하는 용도(2).

3. 조 챗봇 랜딩 페이지에 적용할 한 개의 학습데이터*
: object
: 학생이 서버에 저장한 학습 데이터들 중 하나를 선택, 저장

4. 조 챗봇 랜딩 페이지의 디자인에 적용될 설정값들*
: object
: 저장하기 버튼 클릭 시, 조회 후, DB의 pageSettings에 설정창의 pageSettings로 덮어쓰기

4-1. 조 랜딩 페이지 대표 칼라 테마값*
: string, 1이상 20 이하의 길이
: 예) "blackWhite"

4-2. 조 랜딩 페이지 타이틀*
: string, 1이상 30 이하의 길이

4-3. 조 랜딩 페이지 설명*
: string, 1 이상 100 이하의 길이

4-4. 조 메인 배너 이미지*
: object, 이미지 파일의 이름, 스토리지 주소
: 구성 값
  : 4-4-1. name (strin)
  : 4-4-2. path (url)

4-5. 조 챗봇 이름*
: string, 1 이상 12 이하의 길이

4-6. 조 챗봇 한줄소개*
: string, 1 이상 30 이하의 길이

4-7. 조 챗봇 목적*
: string, 1 이상 100 이하의 길이

4-8. 조 챗봇 사용설명*
: string, 1 이상 100 이하의 길이

4-9. 조 챗봇 기대효과*
: string, 1 이상 30 이하의 길이

4-10. 조 환영 메시지*
: string, 1 이상 60 이하의 길이

4-11. 조 챗봇 아이콘*
: emoji string(utf8mb4)
2. 스키마 구성을 위한 변수명 정의
NestJS 프로젝트 생성 전, json 형태로 타입을 짜보고, 테스트 데이터도 넣었다. 페이지를 꾸미는 용도의 셋팅값과 챗봇을 구성하는 값을 각각 구분하여 작성했다.
{
    userNum: 1234,
    classNum: 5678,
    chatbotSetting: {
	   learningData: {
            topK: 0,
            topP: 0.7,
            content: "이것은 챗봇 학습 데이터"
    	},
        chatbotName: "챗봇",
        chatbotDescription: "챗봇 한줄소개",
        chatbotPurpose: "챗봇 목적",
        chatbotGuide: "챗봇 사용설명",
        chatbotExpectedEffect: "챗봇 기대효과",
        chatbotWelcomeMessage: "챗봇 환영 메시지",
        chatbotIcon: "😻"
    },
    pageSetting: {
        theme: "blackWhite",
        title: "랜딩페이지 타이틀입니다.",
        description: "랜딩페이지 설명입니다.",
        mainBanner: {
            name: "cat.png",
            path: "https://forumadmin.blob.core.windows.net/images/62f37380-f9cc-11ed-bb64-372aa008c65d.png",
        }
    }
}
3. 프로젝트 생성 및 디렉터리 초기화
순서 1. 원하는 경로에 프로젝트를 생성한다
npm install -g @nestjs/cli

npx @nestjs/cli new nestjs-api-practice-1
순서 2. 아래와 같이 디렉터리를 초기화 한다.

순서 3. 컨트롤러, 서비스를 모듈에 등록하고, main.ts 코드도 아래와 같은지 확인한다. main.ts는 앱이 실행되었을 때 처음으로 실행되는 계층이다.
// app.module.ts

import { Module } from "@nestjs/common";
import { LandingPageController } from "./landingPage.controller";
import { LandingPageService } from './landingPage.service';

@Module({
  imports: [],
  controllers: [LandingPageController],
  providers: [LandingPageService]
})
export class AppModule { }
// landingPage.controller.ts

export class LandingPageController { }
// landingPage.service.ts

export class LandingPageService { }
// main.ts

import { NestFactory } from '@nestjs/core';
import { AppModule } from './app.module';

async function bootstrap() {
  const app = await NestFactory.create(AppModule);
  await app.listen(3000);
}
bootstrap();
4. 스키마(landingPage.schema.ts) 작성하기
순서 1. mongoose 의존성 패키지 설치하기
npm install @nestjs/mongoose mongoose
순서 2. 도큐먼트 타입과 스키마를 작성한다
@Prop({ type: Object })를 사용하여 Object 타입을 지정하는 방식은 좋지 않다. 가능한 한 해당 객체의 구조를 명확하게 정의하는 것이 좋다. 아래 작성한 코드를 참고하도록 하자
// landingPage.schema.ts

import { Schema, Prop, SchemaFactory } from "@nestjs/mongoose";
import { Document } from "mongoose";

// 도큐먼트 정의
export type LandingPageDocument = LandingPage & Document;

@Schema()
export class LearningData {
    @Prop()
    topK: number;

    @Prop()
    topP: number;

    @Prop()
    content: string;
}

@Schema()
export class ChatbotSetting {
    @Prop({ type: LearningData })
    learningData: LearningData

    @Prop()
    chatbotName: string;

    @Prop()
    chatbotDescription: string;

    @Prop()
    chatbotPurpose: string;

    @Prop()
    chatbotGuide: string;

    @Prop()
    chatbotExpectedEffect: string;

    @Prop()
    chatbotWelcomeMessage: string;

    @Prop()
    chatbotIcon: string;
}

@Schema()
export class MainBanner {
    @Prop()
    name: string;

    @Prop()
    path: string;
}


@Schema()
export class PageSetting {
    @Prop()
    theme: string;

    @Prop()
    title: string;

    @Prop()
    description: string;

    @Prop({ type: MainBanner })
    mainBanner: MainBanner;
}


// 메인 스키마
@Schema()
export class LandingPage {
    @Prop()
    userNum: number;

    @Prop()
    classNum: number;

    @Prop({ type: ChatbotSetting })
    chatbotSetting: ChatbotSetting; // chatbotSetting 객체의 구조를 명확하게 지정

    @Prop({ type: PageSetting })
    pageSetting: PageSetting; // pageSetting 객체의 구조를 명확하게 지정
}

// 스키마 생성
export const LandingPageSchema = SchemaFactory.createForClass(LandingPage);
5. 몽고DB(landingPage.repository.js)를 사용하는 리포지토리 추가하기
순서 1. Backend API 명세서를 보고 아래와 같이 스펙을 정리한다
| URL | HTTP 메서드 | 설명 |
|---|---|---|
| /landingPage | GET | 모든 유저의 랜딩페이지 구성값을 가져온다 |
| /landingPage/클래스 고유번호/유저 고유번호 | GET | params로 넘어온 유저 고유번호와 클래스 고유번호로 해당 유저의 랜딩페이지 구성값을 가져온다 |
| /landingPage | POST | 랜딩페이지의 구성값을 작성한다 |
| /landingPage | PUT | 랜딩페이지의 구성값을 수정한다 |
순서 2. 위 스펙을 인터페이스(LandingPageRepository)를 녹여내어 작성한다. 인터페이스는 클라이언트로 HTTP params와 body등을 전달받아 통신하는 데이터를 의미한다. 그리고 인터페이스에서 Object Object도 위 스키마 정의 때와 비슷하게 필요한 필드를 추가하여 정의할 수 있다.
// landingPage.model.ts

// 각 interface를 필드라고 부른다
export interface LearningData {
    topK: number;
    topP: number;
    content: string;
}

export interface ChatbotSetting {
    learningData: LearningData;
    chatbotName: string;
    chatbotDescription: string;
    chatbotPurpose: string;
    chatbotGuide: string;
    chatbotExpectedEffect: string;
    chatbotWelcomeMessage: string;
    chatbotIcon: string;
}

export interface MainBanner {
    name: string;
    path: string;
}

export interface PageSetting {
    theme: string;
    title: string;
    description: string;
    mainBanner: MainBanner;
}

export interface PostDto {
    userNum: number;
    classNum: number;
    chatbotSetting: ChatbotSetting // chatbotSetting 객체의 구조를 명확하게 지정
    pageSetting: PageSetting; // pageSetting 객체의 구조를 명확하게 지정
}
순서 3. 리포지토리(landingPage.repository.ts)에 인터페이스를 정의하고, 몽고DB를 다룰 함수를 정의한다.
import { InjectModel } from "@nestjs/mongoose";
import { Model } from "mongoose";
import { LandingPage, LandingPageDocument } from "./landingPage.schema";
import { PostDto } from "./landingPage.model";
import { Injectable } from "@nestjs/common";

// 리포지토리 인터페이스 정의
export interface LandingPageRepository {
    getAllPost(): Promise<PostDto[]>;
    getPost(userNum: number, classNum: number): Promise<PostDto>;
    createPost(postDto: PostDto);
    updatePost(userNum: number, classNum: number, postDto: PostDto);
}

@Injectable()
export class LandingMongoRepository implements LandingPageRepository {
    // landingPageModel 주입
    constructor(@InjectModel(LandingPage.name) private landingPageModel: Model<LandingPageDocument>) { }

    // 모든 유저의 랜딩페이지 구성값을 가져옴
    async getAllPost(): Promise<PostDto[]> {
        return await this.landingPageModel.find().exec();
    }

    // 랜딩페이지의 구성값을 작성(생성)
    async createPost(postDto: PostDto) {
        const createPost = {
            ...postDto,
            createdDt: new Date(),
            updatedDt: new Date(),
        };
        this.landingPageModel.create(createPost);
    }

    // 특정 유저의 랜딩페이지의 구성값을 읽기
    // .findOne 메서드로 회원 고유번호와 클래스 고유번호를 키값으로 찾음
    async getPost(userNum: number, classNum: number): Promise<PostDto> {
        return await this.landingPageModel.findOne({ userNum, classNum });
    }

    // 랜딩페이지의 구성값을 수정
    async updatePost(userNum: number, classNum: number, postDto: PostDto) {
        const updatePost = {
            userNum,
            classNum,
            ...postDto,
            updatedPost: new Date()
        };
        await this.landingPageModel.findOneAndUpdate({ userNum, classNum }, updatePost)
    }
}
6. 서비스(LandingPageService) 작성하기
리포지토리 의존성을 주입하고, 리포지토리를 사용하는 단순한 로직으로 변경한다.
// landingPage.service.ts

import { PostDto } from "./landingPage.model";
import { Injectable } from "@nestjs/common";
import { LandingMongoRepository } from "./landingPage.repository";

@Injectable()
export class LandingPageService {
    // 리포지토리 의존성 주입
    constructor(private landingRepository: LandingMongoRepository) { }

    async getAllPosts() {
        return await this.landingRepository.getAllPost();
    }

    createPost(postDto: PostDto) {
        this.landingRepository.createPost(postDto);
    }

    // 1. 예외처리 하지 않으면 서버 종료 됨
    async getPost(userNum: number, classNum: number) {
        try {
            return await this.landingRepository.getPost(userNum, classNum);
        } catch (error) {
            console.log(error)
        }
    }

    // 수정된 결과를 보여주기 위해 return
    updatePost(userNum: number, classNum: number, postDto: PostDto) {
        return this.landingRepository.updatePost(userNum, classNum, postDto)
    }
}
1번. getPost()를 호출하는데도, 리턴값이 없길래 원인을 찾아봤더니, return await을 해주지 않아 결과를 받아볼 수가 없었다. 응답은 되는데 결과가 반환되지 않는다면, 이쪽을 살펴보자
7. 컨트롤러(landingPage.controller) 작성하기
서비스 의존성을 주입하여 아래와 같이 작성한다.
// landingPage.controller.ts

import { LandingPageService } from "./landingPage.service";
import { Controller, Get, Post, Body, Param, Put } from "@nestjs/common";

// API 호출시, <베이스URL>/landingPage 설정
@Controller('landingPage')
export class LandingPageController {

  // 서비스 의존성 주입
  constructor(private landingPageService: LandingPageService) { }

  @Get()
  getAllPosts() {
    console.log('모든 랜딩페이지 정보 가져오기');
    return this.landingPageService.getAllPosts();
  }

  @Post()
  createPost(@Body() postDto) {
    console.log('랜딩페이지 작성');

    this.landingPageService.createPost(postDto);
    return 'success';
  }

  @Get('/:classNum/:userNum')
  getPost(@Param('userNum') userNum: number, @Param('classNum') classNum: number) {
    console.log('랜딩페이지 하나 가져오기');
    return this.landingPageService.getPost(userNum, classNum);
  }

  @Put('/:classNum/:userNum')
  updatePost(@Param('userNum') userNum: number, @Param('classNum') classNum: number, @Body() postDto) {
    console.log('랜딩페이지 업데이트');
    return this.landingPageService.updatePost(userNum, classNum, postDto);
  }
}
8. 모듈(app.module.ts)로 패킹
app.module.ts에 imports와 provider를 설정한다.
// app.module.ts

import { Module } from "@nestjs/common";
import { LandingPageController } from "./landingPage.controller";
import { LandingPageService } from './landingPage.service';
import { MongooseModule } from "@nestjs/mongoose";
import { LandingPage, LandingPageSchema } from "./landingPage.schema";
import { LandingMongoRepository } from "./landingPage.repository";

@Module({
  imports: [
    // 1. 몽고DB 연결 설정, 끝에 데이터베이스(landingPage)의 이름으로 변경
    MongooseModule.forRoot(
      'mongodb+srv://<유저명>:<비번>@cluster0.vbpuhau.mongodb.net/landingPage'
    ),
    // 2. 몽고DB 스키마 설정
    MongooseModule.forFeature([{ name: LandingPage.name, schema: LandingPageSchema }])
  ],
  controllers: [LandingPageController],
  // 3. 프로바이더 설정
  providers: [LandingPageService, LandingMongoRepository]
})
export class AppModule { }
9. Postman 테스트하기
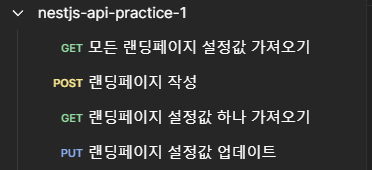
순서 1. Postman에 아래와 같이 request를 생성했다
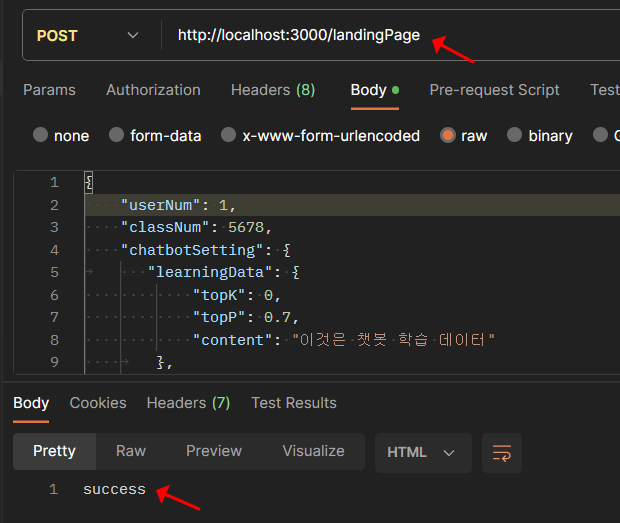
순서 2. POST 랜딩페이지 작성 테스트
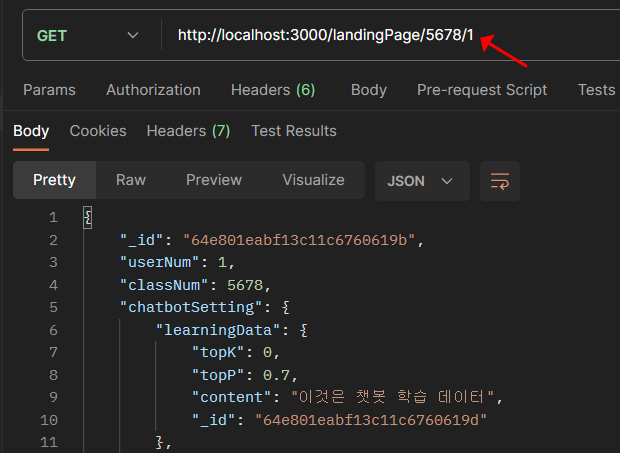
순서 3. GET 랜딩페이지 설정값 하나 가져오기
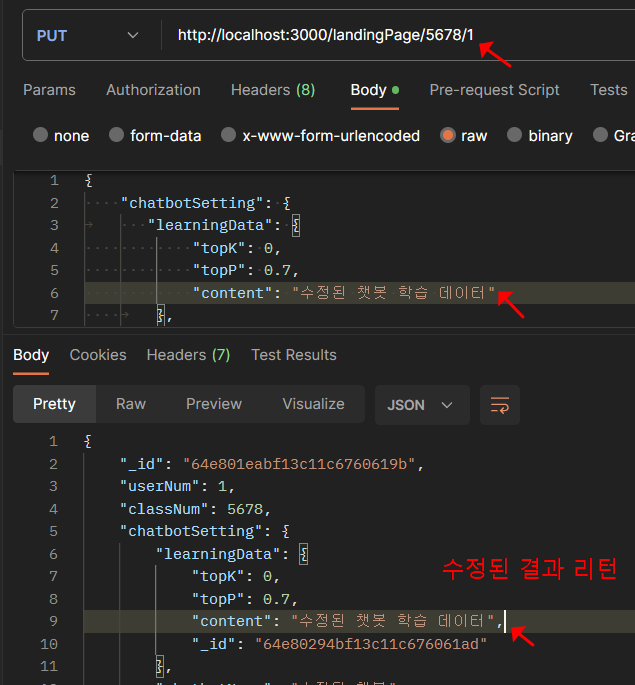
순서 4. PUT 랜딩페이지 설정값 업데이트
순서 5. GET 모든 랜딩페이지 설정값 가져오기
(생략)
10. 시행착오들
- 서버를 실행했을 때, 터미널에서 로그가 보이지 않았는데, 이러한 경우는 main.ts에 코드가 없어서 발생한 문제였다.
// main.ts

import { NestFactory } from '@nestjs/core';
import { AppModule } from './app.module';

async function bootstrap() {
  const app = await NestFactory.create(AppModule);
  await app.listen(3000);
}
bootstrap();
-
테스트는 Postman으로 하자.
-
API 호출 시, 서브 도메인의 설정은 컨트롤러에서 @Controller의 매개변수로 설정할 수 있고, 저기에 있는 값을 메인 도메인뒤에 붙여야 한다.
// landingPage.controller.ts

... 생략 ...
@Controller('landingPage')
export class LandingPageController {

참고
다음에 다루게 될 것
- NestJS로 직접 기획한 API 만들기(2) - Delete와 예외처리
댓글남기기